Introduction
Although Google’s Open Source Lighthouse project was integrated into Chrome in early 2017, I had yet to explore and experiment with this feature. It was only after I accidentally stumbled upon it that I realized it provided me with new and interesting insights into my web apps.
For those unfamiliar, Lighthouse is a way to audit a webpage to get Performance, Progressive Web App, Accessibility, Best Practice and SEO feedback all from the comfort of Chrome. Go into the Audit panel in Developer Tools to test it out yourself. Make sure to run it in a private window so plugins don’t interfere!
This blog post is a reflection of what I have learned doing the audit on my portfolio website home page (https://jeremyshaw.co.nz/).
Overall
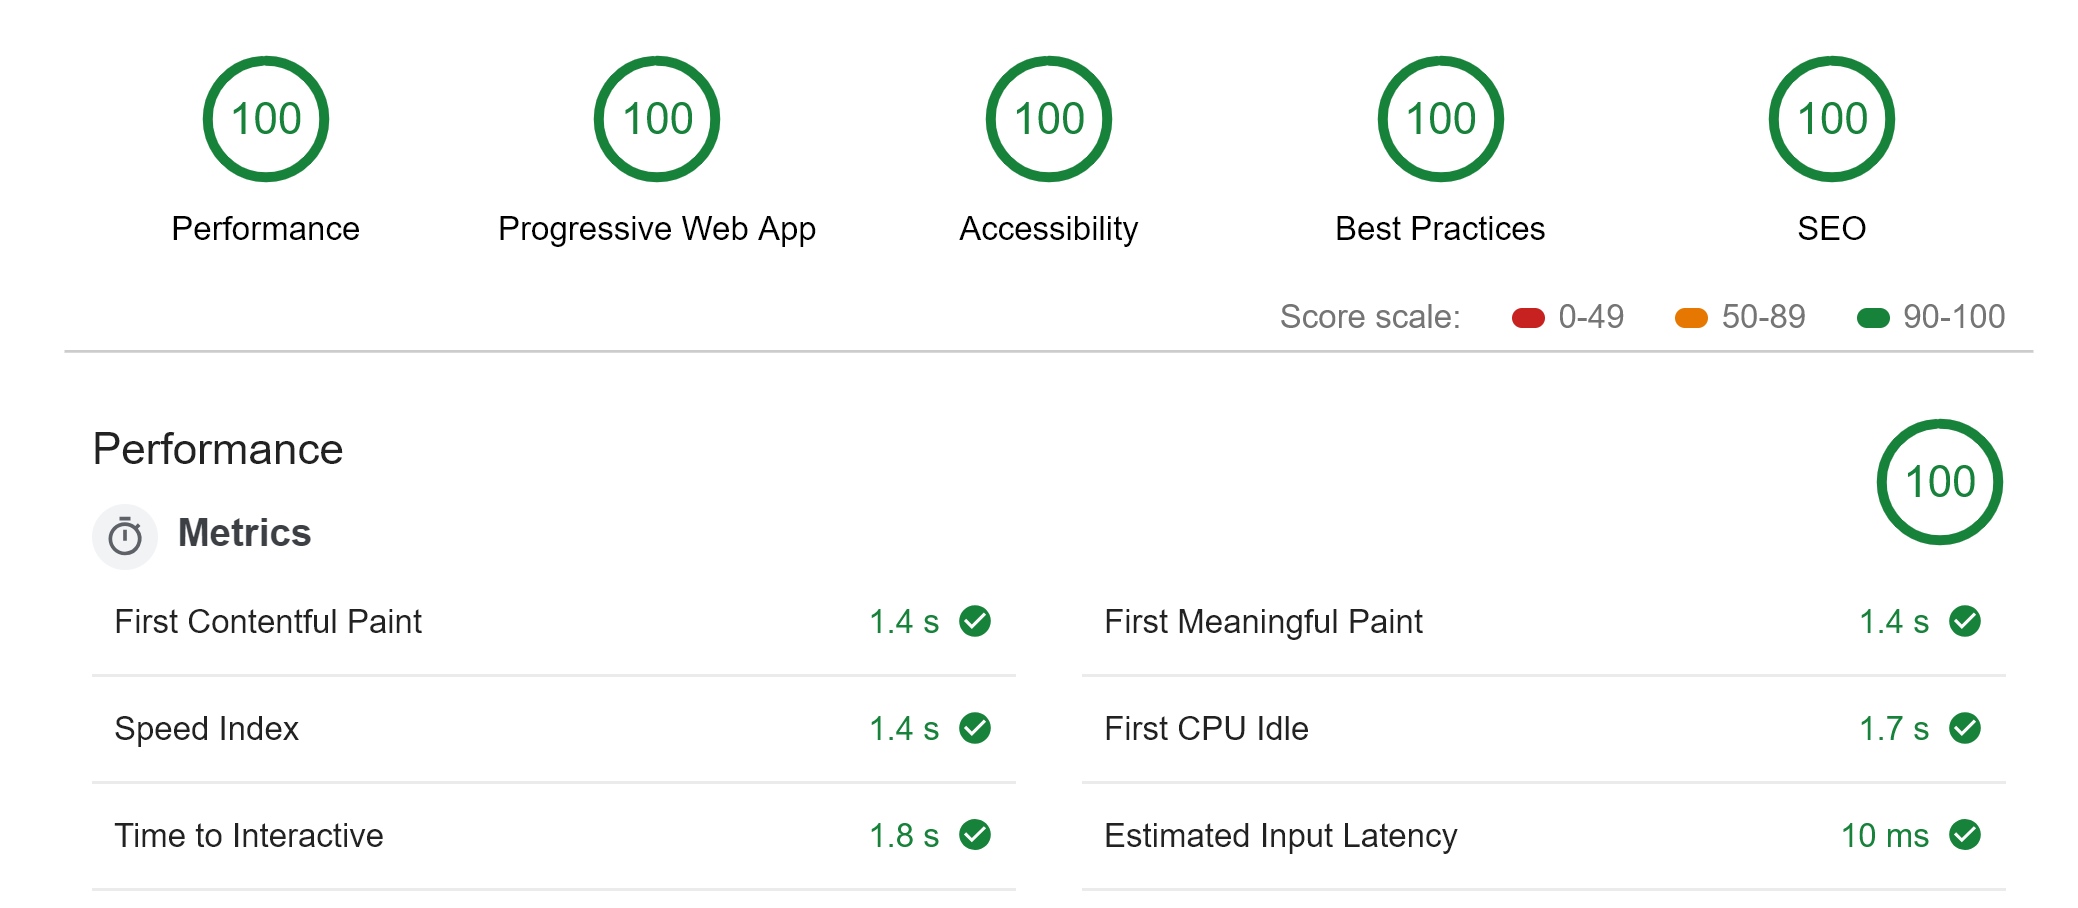
Here were the results of running the first audit.
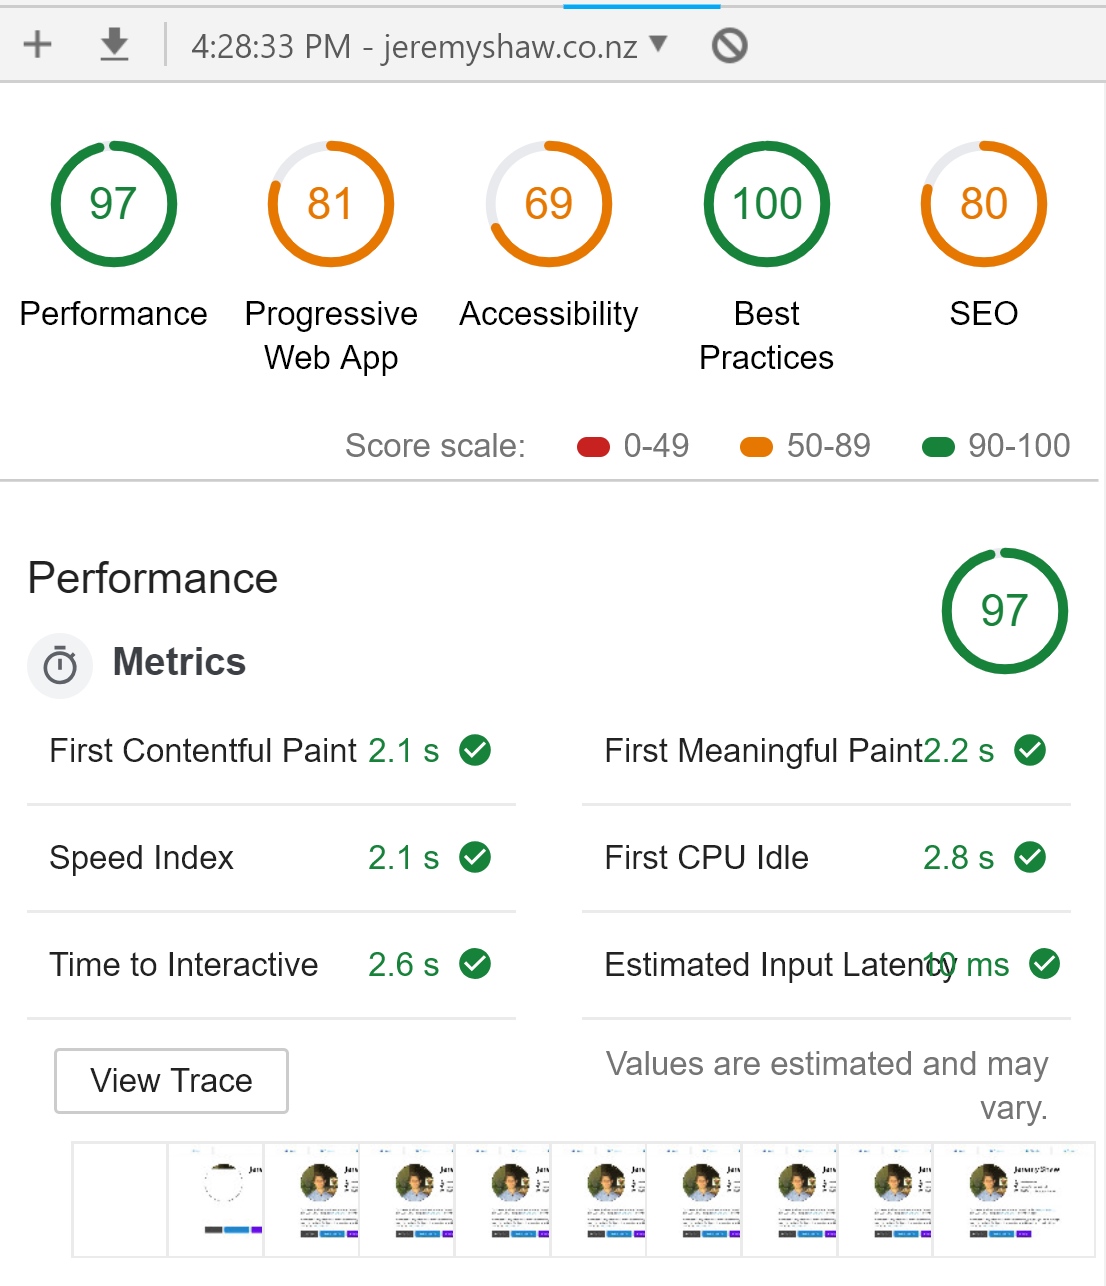
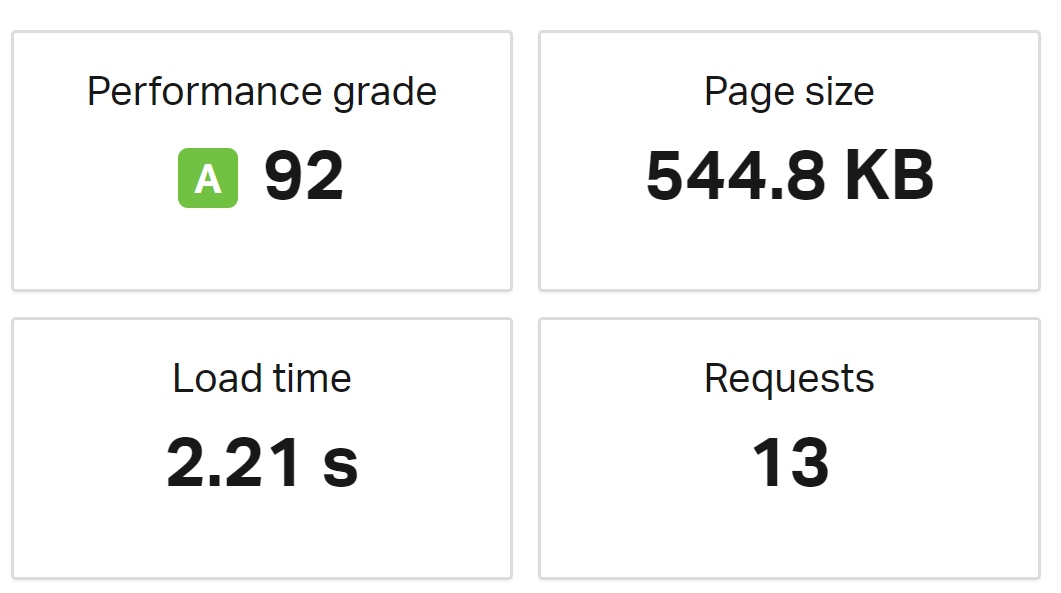
You can see the site already has a decent score, especially in performance considering site is built in React, so the load time also includes all four of my pages. Since I already had a 97 score, I decided to also run a test from Pingdom, which I could also compare at the end of my changes.
Even with this initial score, there is still huge room for improvement, most notably in the Accessibility section. Time to try and get a perfect audit and see what I learn!
Perfomance
Image Formats
The audit result recommended I look into different image formats as I had forgotten to convert my profile picture from png to jpg. One of the recommendations it had made was webp. I had seen this around but never actually used it. Turns out, webp looks just as good as jpg with up to 30% less file size.
The downside to webp is that currently it only has 77.65% browser support, which means it isn’t as easy as just replacing all your jpgs with webp. This is where <picture> comes into play.
The picture tag allows us to have a fallback option for browsers that don’t support webp.
Before
1 | <img src="img/jpg/profile.jpg" className="home-top-left-image" alt="Jeremy Shaw" /> |
After
1 | <picture className="home-top-left-image"> |
Going from png to webp reduced the file size from 280kb to 23kb. Converting my jpg images on my projects page reduced the file size by 20%. However, you will need to update and maintain a directory of webp images. There are many packages that can help with this.
I could keep going on about webp, but for the sake of getting through all of these learnings, I’ll be keeping each section as small as possible!
font-display: swap;
Instead of waiting for your fonts to load before displaying any text, wouldn’t it be nice to display the text in a web safe font and then swap over when it has been loaded in? This is the idea behind the font-display: swap, and it can have massive performance improvements. You may be wondering, why haven’t I heard of this before? The swap rule can only be used in @font-face CSS rules, and although there has been demand for Google Fonts to allow for a font-display option since 2016, the fact is people rarely use @font-face, not allowing us to use this amazing feature. Luckily there’s a solution. https://github.com/swissspidy/local-webfont allows you to easily generate @font-face code using an online font link, allowing you to then change the font-display option to swap.
My font CSS now looks like this.
1 | @font-face { |
Adding that single line in reduced the load time by a whopping 250ms.
Deferring Scripts/Styles
It’s easy to defer non-critical scripts by simply adding a defer value on the <script> tag to increase load speed, but it is not so easy to do the equivalent for CSS.
The solution I went with was to add the CSS in a script tag at the end of the document. The code used was actually written by Google, but this is by no means an official way to do this although it does seem to work in practice.
Another solution would be to use the LoadCss package located at https://github.com/filamentgroup/loadCSS/.
Another thing I picked up when researching deferring styles was that simply changing my Font Awesome link to come from cdnjs can potentially save you up to 100ms. I would highly encourage anyone linking to Font Awesome to change over!
Caching
Not caching my site was just something I had completely overlooked, even though I know exactly how important it is for returning users. Thankfully the audit picked this up too and with a little research into how Firebase handles caching, it was simple to add in rules to cache all my images, js, CSS and font files.
Progressive Web App
Manifest
The audit prompted me to add in various manifest icon sizes, reminding me that I was still using the default React favicon setup. Killing two birds with one stone I used a favicon generating website to quickly favicon code that supports all browsers, the as well manifest code including all my favicons. After adding in one larger icon to the manifest I was done and the audit was happy.
Edit 2022/03/23:
Website Planet also has a Favicon Generator tool which allows you to upload an image up to 5MB instead of 2MB or choose from one of their gallery. Thank you Laurie Sallow for contacting me about this alternative.
Accessibility
Sufficient Contrast Ratio
I was surprised to see an error for this. It turns out the links in my nav-bar were seen as not having enough contrast with the white background. After looking at the site through a monitor with worse colour depth, I began to notice what Google had warned me about. Luckily a small change to the tone of the blue was enough to make the difference.
You can test out what the contrast ratio is on any element by using Chromes color picker when you inspect element.
<li> parent must be <ul> or <ol>
Something I have always been guilty of is wrapping my <li> elements with <a>. As far as I knew everyone did it and there was nothing wrong with it. It turns out this can have a serious impact on people who use screen readers to navigate the web and therefore a <li> element should always have a <ul> or <ol> parent.
By placing the <a> inside <li>, you can get the same full-width effect as before by using the code below.
1 | li a { |
SEO
robots.txt
I haven’t had much experience in robots.txt so it was interesting reading about how they work and why web crawlers need them. It turns out robots.txt files are super easy to create. Due to the simple nature of my portfolio and the fact that React already has a public build folder, my robots.txt file just ended up looking like below.
1 | User-agent: * |
Conclusion
What started out as a fun test ended up as a discovery of many useful and interesting techniques to further better my site in any way possible. My coworker warned me I would get too deep into the audit and he was totally right. Below is the finished project of my hard work!
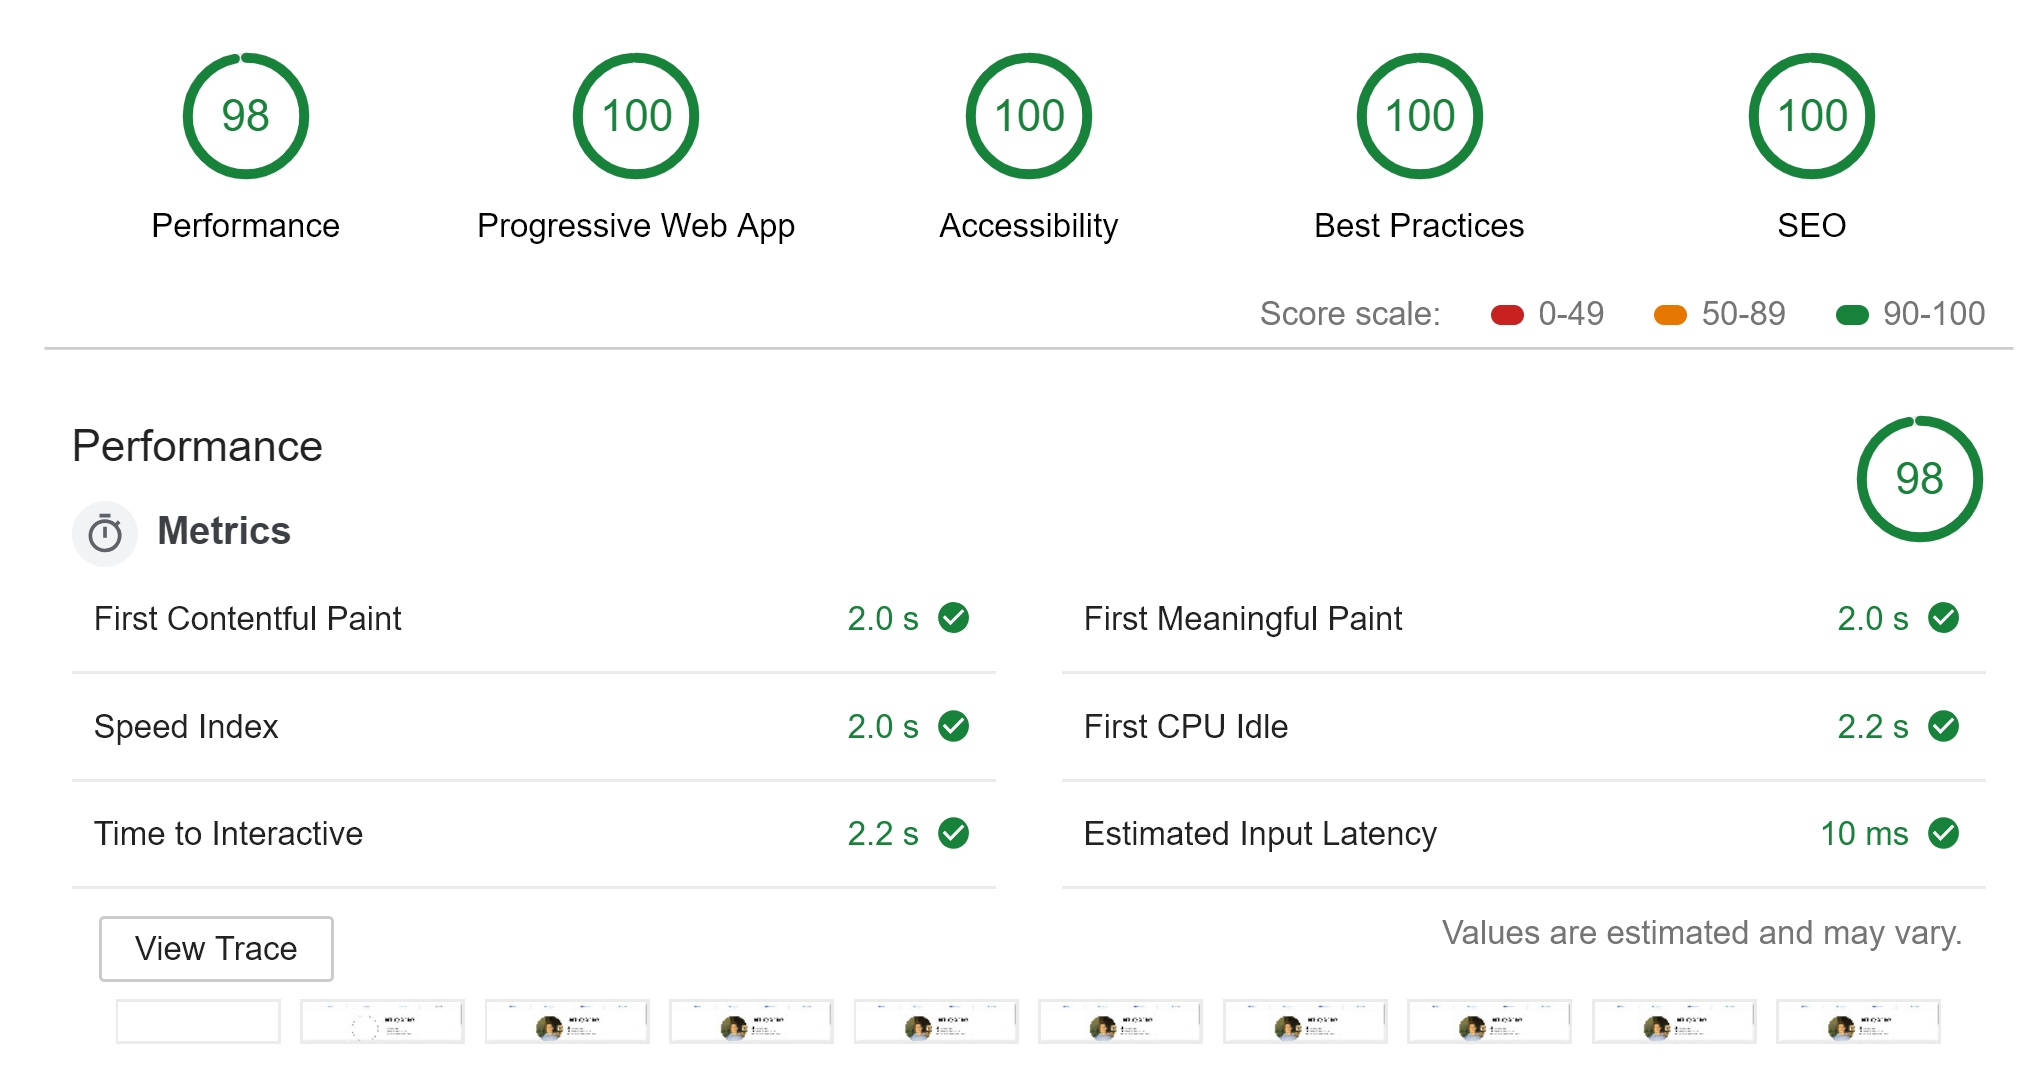
I received a 98/100 on performance due to chaining too many resources. Adding the Font Awesome style as a React package would solve this issue, however, I would rather lazy load the sheet which isn’t easily possible if I decide to integrate it into the app which is why I decided to leave it be.
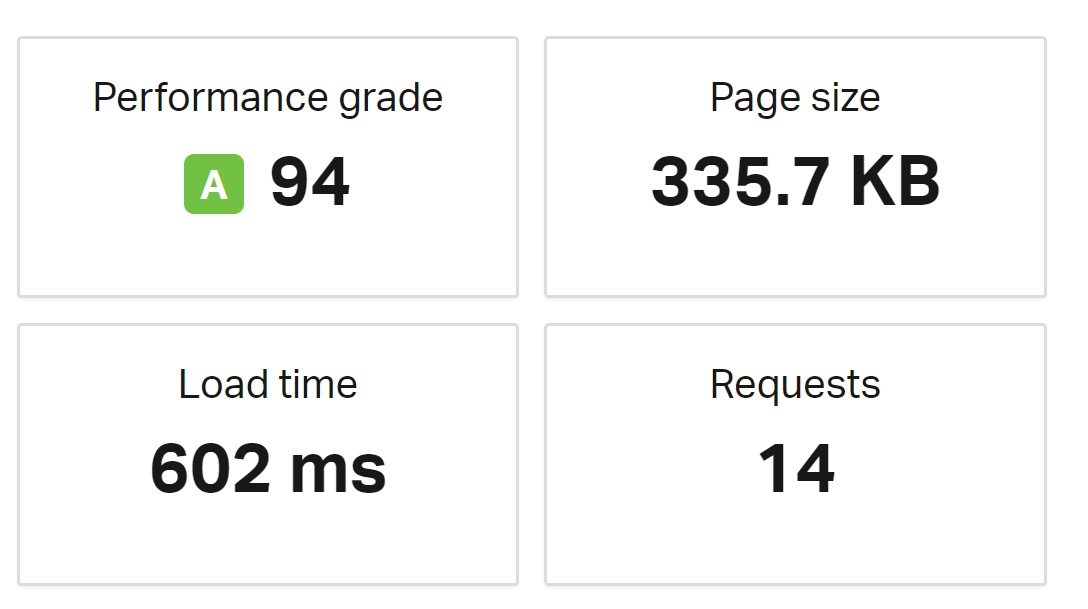
Even though my performance rating barely improved, this Pingdom test shows the progress I made. This value seems somewhat inconsistent though, which has lead me to investigate solutions… Stay tuned for the next blog post!
Edit 2019/03/25:
I imported EmailJS instead of deferring it as a script link. This generated a perfect score and minimized my load time even though practically, it shouldn’t have affected anything. The inital page load speed has remained the same.
Learn something new? Want to correct one of my blunders? Feel free to leave a comment below! Thank you for reading.